[Save] Button
 
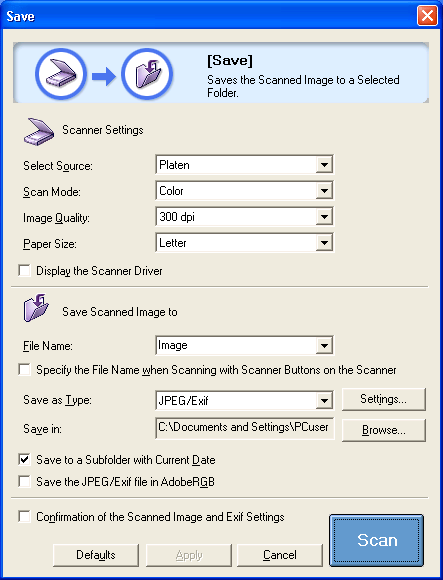
This function scans an item and saves the results to an image file or PDF file.
 
The following window is displayed when the [Save] button is clicked in the Toolbox main window.


Select Source
 
Selects the type of document to scan.
 
Platen Scans paper documents and photographs.
Film Scans 35 mm film.
Auto mode Automatically judges whether it is a platen item or film and scans accordingly.
 
When [Auto mode] is selected, the settings for the [Scan Mode], [Image Quality] and [Paper Size] categories cannot be selected. The following settings are used to scan.
Scan Mode Image Quality
Platen Color (Multi-Scan) 300 dpi
Film Scan all frames Standard (300 dpi)

Scan Mode
 
Selects how the document is scanned depending on the document type.
 
Black and White Scans an item as a black and white image. The contrast of the image is expressed as a black or white.
Grayscale Scans monochrome photographs when grayscale images are needed. The [Descreen] function is set to [OFF].
Grayscale (Magazines / Catalogs) Scans monochrome documents. The [Descreen] function is set to [ON].
Color Scans color photographs and documents with the [Descreen] function set to [OFF].
Color (Magazine) Scans color documents with the [Descreen] function set to [ON].
Color (Multi-Scan) Scans color photographs and documents. If more than one item is placed on the document glass of the scanner, each one is automatically cut out, straightened, and placed in an individual file.
Color (Auto crop) Scans color documents. Automatically detects item positions and scans the smallest possible area into which all items will fit.
Scan all frames (film only) Scan all the detected frames.
Display thumbnails (film only) Display the thumbnails of the detected frames, and then scan the selected frames.
 
Multiple files are opened when the [Scan Mode] is set to [Color (Multi-Scan)].
However, only one PDF file is opened even if multiple pages are scanned when the [Save as Type] category is set to [PDF (Multiple Pages)].
Moiré patterns may appear in images scanned from printed materials. The [Descreen] function limits this to the greatest possible extent. However, scanning takes longer when [Descreen] is set to [ON].
For instructions on how to place documents on the scanner: Multi Scan Functions

Image Quality
 
This category selects the scanning resolution.
The higher the resolution (the larger the value), the finer the resulting image.
 
Platen 75 dpi, 100 dpi, 150 dpi, 200 dpi, 300 dpi, 400 dpi, 600 dpi, 800 dpi and 1200 dpi.
Film High Speed (150dpi): Scans at 150 dpi. Select this option to print the scanned image at the photo size (4" x 6").
Standard (300dpi): Scans at 300 dpi. Select this option to print a high-quality print at the photo size (4" x 6").
High Quality (600dpi): Scans at 600 dpi. Select this option to print up to A4 or Letter size, or for printing on a high performance color printer.
 
If [Scan Mode] is set to [Color (Auto crop)] or [Color (Multi-Scan)], the following [Image Quality] settings are available: [75 dpi], [150 dpi], [300 dpi], [600 dpi].
If [Scan Mode] is set to [Color (Magazine)], the maximum [Image Quality] setting is [600 dpi].

If [Save as Type] is set to [PDF], [PDF (Multiple Pages)] or [PDF (Add Page)], the maximum [Image Quality] setting is [400 dpi]. However, the maximum [Image Quality] setting is [300 dpi] when [Scan Mode] is set to [Color (Auto crop)] or [Color (Multi-Scan)].

In Macintosh, when the [Save as Type] is set to [PICT], the [Image Quality] will change in response to the [Paper Size] you select because PICT file specifications restrict the image width to a maximum of 4096 pixels.
For information on resolutions: Resolution Settings

Paper Size
 
This category sets the size of the item to be scanned.
 
Platen A4, A5 Portrait, A5 Landscape, Letter, Business Card, 4" x 6" Portrait, 4" x 6" Landscape, Stitch-assist (11"x17"), Stitch-assist (A3), Stitch-assist (Platen x2), Custom
Film 35mm Film
 
If the [Stitch-assist (11"x17")], [Stitch-assist (A3)] or [Stitch-assist (Platen x2)] option is selected, the program scans the left half and then the right half of the item, and merges both halves into one image.
For details: Stitch-assist Procedures (Scanning a Document Larger than Document Glass)
 
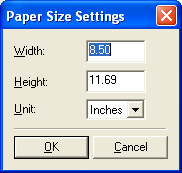
If the [Custom] option is selected, the [Paper Size Settings] window opens. Select a [Unit] option, input [Width] and [Height] values, and click the [OK] button.
 
 
The [Paper Size] cannot be selected when [Scan Mode] is set to [Color (Multi-Scan)] or [Color (Auto crop)].

Display the Scanner Driver
 
This category sets whether or not the scan settings are set with the ScanGear scanner driver, allowing you to adjust the scan settings in detail.
 
The Scanner settings in the [Save] window, such as [Select Source], [Scan Mode] and [Paper Size], and [Image Quality] are disabled. Set them in the ScanGear window instead.
 
If you have selected Color/A4 and more than 1200 dpi in the ScanGear window, a warning message will display and you will not be able to proceed with the scan. Select a smaller paper size and lower resolution.
When the file type in the [Save as Type] category is set to [PDF], [PDF (Multiple Pages)] or [PDF (Add Page)], and you have selected Color/Full Platen and more than 400 dpi in the ScanGear window, a warning message will display and you will not be able to proceed with the scan. Select a smaller paper size and lower resolution.
This category cannot be selected when the [Save the JPEG/Exif file in AdobeRGB] option is checked.
If [Black and White] has been selected in the ScanGear window and the [Save as Type] category has been set to [JPEG/Exif], the image will be saved as a JPEG grayscale file.
If [Multi-Scan] was selected in the ScanGear window, the number of files corresponding to the number of items on the document glass of the scanner is saved.
For ScanGear settings: Simple Mode Functions, Advanced Mode Functions, or Multi Scan Functions

File Name
 
Input a file name here for the scanned image.
 
When you use the default file name to scan two or more images (i.e., selecting [Color (Multi-Scan)] as the [Scan Mode]) and store the files in a folder, a sequential four-digit number such as "0001" is appended to the end of each file name starting from the first image (i.e., Image0001, Image0002, Image0003...).
When you use a file name other than the default one, that name is used without modification for the first image, but subsequent images have a sequential four-digit number, such as "0001" appended (i.e., ABC, ABC0001, ABC0002...).
The file name extension is automatically added.
When the [Save the JPEG/Exif file in AdobeRGB] option is checked, the file will have "_ (underscore)" appended before the file name (i.e., _Image0001).
The ten last entered file names are recorded. Click at the right end of [File Name] to select the name you entered previously.

Specify the File Name when Scanning with Scanner Buttons on the Scanner
 
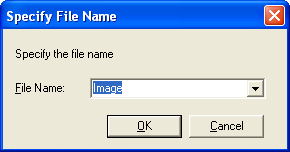
If you enable this option, you can specify a file name when scanning with a scanner button. When you press a scanner button, the [Specify File Name] window is displayed.
 
 
Enter a file name in [File Name] and click the [OK] button.
The ten last entered file names are recorded. Click at the right end of [File Name] to select the name you entered previously.

Save as Type
 
This category selects the file format for saving the scanned image.
 
BMP Save the scanned image as the standard bitmap format for Windows.
It is used when an image file will only be used with Windows.
PICT Save the scanned image as the standard graphics file format for the Macintosh.
It is used when an image file will only be used with Macintosh.
JPEG/Exif Save the scanned image as the JPEG format.
Cannot be selected for [Black and White] mode image.
TIFF Save the scanned image as the format that can be used on various computer platforms and in many applications.
PDF Save the scanned image as the PDF format.

PDF (Multiple Pages)

Inserts a multiple-page document into a single PDF file. A dialog will appear as each page is scanned on the document glass.
To scan successive pages, place the next page on the document glass before clicking [Next]. Click [Finish] to cease scanning pages into the file.
PDF (Add Page) Inserts pages into an existing PDF file, producing a single file.
Use the [Browse] button to set the [Add Scanned Image to] category. Specify the file and click [Save].
The original file specified in [Add Scanned Image to] is kept as it is, and a new file with a new file name will be created to store the new pages.
 
If [Scan Mode] is set to [Black and White], [JPEG/Exif] cannot be selected.
Only PDF files created with CanoScan Toolbox 4.7 or later can be specified for [PDF (Add Page)]. PDF files created or edited by other application programs cannot have pages appended to them even if they are selected.
When scanning multiple pages of text or monochrome documents for [PDF (Multiple Pages)] or [PDF (Add Page)], it is recommended to set [Scan Mode] to [Black and White] or [Grayscale].
You are recommended to limit the number of pages in any one multiple PDF file with [PDF (Multiple Pages)] or [PDF (Add Page)] to 20 or less if you are scanning a color document with the [Image Quality] set to [300 dpi] and the size to a setting equivalent to Letter size.
For file types and formats supported: File Types and Formats

[Settings] Button
 
Displays the [File Settings] window, where you can set various settings (i.e., compression type and PDF format) for the saved files.
For details: [File Settings] Window

Save in
 
This box displays the location to which the scanned image will be saved.
To change the folder in which it will be saved, click the [Browse] button, select a folder and click [OK] button (Windows)/[Choose] button (Macintosh).

Save to a Subfolder with Current Date
 
This category sets whether or not a subfolder bearing the scanning date is created in the selected folder and the image files are saved to it.
 
When [Save as Type] is set to [PDF (Add Page)], this function is disabled.

Save the JPEG/Exif file in AdobeRGB (Windows only)
 
If a check mark is placed here, the saved image will have a color profile compatible with the Adobe RGB profile.
 
This category cannot be selected when the [Display the Scanner Driver] option is checked.
When the [Save the JPEG/Exif file in AdobeRGB] option is checked, the file will have "_(underscore)" appended before the file name (i.e. _Image0001).

Confirmation of the Scanned Image and Exif Settings
 
Place a check mark in this category to view scanned thumbnail images and set the location and file format for saving the image.
For details: Confirmation of the Scanned Image and Exif Settings

[Defaults] Button
 
This button restores each setting in the window to its default setting.

[Apply] Button
 
This button makes the selected settings take effect and display the next time the window is used.
Pressing the [Cancel] button instead of [Apply] will reset the changes to the previous state.
 
The next time you press a scanner button to start a function, it will use the settings saved with the [Apply] button.
For instructions on scanning with the scanner buttons: Scanning with Scanner Buttons

[Cancel] Button
 
This button cancels any settings that you have changed, closes the window that is currently open and displays the Toolbox main window.

[Scan] Button
 
This button initiates a scan of the item using the selected settings. When the scan is complete, it saves the image file to the specified folder.
 
If [Scan Mode] is set to [Color (Multi-Scan)], multiple files are saved.

Top