|
|
| |
This category selects the scanning resolution.
The higher the resolution (the larger the value), the finer the resulting
image. |
| |
Platen
|
75 dpi, 100 dpi,
150 dpi, 200 dpi, 300 dpi, 400 dpi, 600 dpi, 800 dpi and 1200 dpi.
|
Film
|
High Speed (150dpi):
Scans at 150 dpi. Select this option to print the scanned image at
the photo size (4" x 6").
Standard (300dpi): Scans at 300 dpi. Select this option to print
a high-quality print at the photo size (4" x 6").
High Quality (600dpi): Scans at 600 dpi. Select this option to print
up to A4 or Letter size, or for printing on a high performance color
printer. |
|
| |
 |
 |
• |
If [Scan Mode] is set to [Color (Auto
crop)] or [Color (Multi-Scan)], the following [Image Quality] settings
are available: [75 dpi], [150 dpi], [300 dpi], [600 dpi]. |
| • |
If [Scan Mode] is set to [Color (Magazine)],
the maximum [Image Quality] setting is [600 dpi]. |
| • |
In Macintosh, when the [Save as Type]
is set to [PICT], the [Image Quality] will change in response to
the [Paper Size] you select because PICT file specifications restrict
the image width to a maximum of 4096 pixels. |
 |
 |
• |
For information on resolutions: Resolution
Settings |
 |
|
|
|
| |
| This category sets the size of the item to be scanned. |
| |
| Platen |
A4, A5 Portrait,
A5 Landscape, Letter, Business Card, 4" x 6" Portrait,
4" x 6" Landscape, Stitch-assist (11"x17"), Stitch-assist
(A3), Stitch-assist (Platen x2), Custom |
| Film |
35mm Film |
|
| |
If the [Stitch-assist (11"x17")], [Stitch-assist (A3)] or [Stitch-assist
(Platen x2)] option is selected, the program scans the left half and then
the right half of the item, and merges both halves into one image.
For details: Stitch-assist Procedures (Scanning
a Document Larger than Document Glass) |
| |
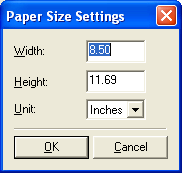
| If the [Custom] option is selected, the [Paper Size Settings] window
opens. Select a [Unit] option, input [Width] and [Height] values, and click
the [OK] button. |
| |
 |
| |
 |
 |
• |
The [Paper Size] cannot be selected
when the [Scan Mode] is set to [Color (Multi-Scan)] or [Color (Auto
crop)]. |
 |
|
| Display the Scanner Driver |
|
| |
| This category sets whether or not the scan settings are set with the
ScanGear scanner driver, allowing you to adjust the scan settings in detail. |
| |
| The Scanner settings in the [Photo-1]/[Photo-2] window, such as [Select
Source], [Scan Mode] and [Paper Size], et cetera, are disabled. Set them
in the ScanGear window instead. |
| |
 |
 |
• |
Setting the file type in the [Save
as Type] category to [JPEG/Exif] overrides the [Black and White]
Scan Mode setting in the ScanGear window. The image gets saved as
a JPEG grayscale image. |
| • |
This category cannot be selected when
the [Save the JPEG/Exif file in AdobeRGB] option is checked. |
| • |
When you have selected Color/A4 and
more than 1200 dpi in the ScanGear window, a warning message will
display and you will not be able to proceed with the scan. |
 |
 |
• |
If [Multi-Scan] is selected in the
ScanGear window, the number of image files sent to the application
program corresponds to the number of items on the document glass
of the scanner. |
| • |
For ScanGear settings: Simple
Mode Functions, Advanced Mode Functions or Multi
Scan Functions |
 |
|
|
|
| |
| Input a file name here for the scanned image. |
| |
 |
 |
• |
When you use the default file name
to scan two or more images (i.e., selecting [Color (Multi-Scan)]
as the [Scan Mode]) and store the files in a folder, a sequential
four-digit number such as "0001" is appended to the end
of each file name starting from the first image (i.e., Scan10001,
Scan10002, Scan10003...).
When you use a file name other than the default one, that name is
used without modification for the first image, but subsequent images
have a sequential four-digit number, such as "0001" appended
(i.e., ABC, ABC0001, ABC0002...). |
| • |
The file name extension is automatically
added. |
| • |
When the [Save the JPEG/Exif file in
AdobeRGB] option is checked, the file will have "_ (underscore)" appended
before the file name (i.e., _Scan10001). |
| • |
The ten last entered file names are
recorded. Click  at
the right end of [File Name] to select the name you entered previously. at
the right end of [File Name] to select the name you entered previously. |
 |
|
|
|
| |
| This category sets the application program to which images are sent.
The currently linked program is displayed in the box. |
| |
| To Link a Different Program |
| |
| Method 1 |
| |
| To link a different program, click the [Set] button, select the program
you wish to use, and click the [OK] button. The program file you choose
must be an executable file. |
| |
| <Windows> |
| Most application programs are contained within a folder labeled with
its name or the software manufacturer's name inside the [Program Files]
folder. The [.exe] file name extension is always appended to an executable
file*. Double-click the file to confirm in advance that it starts the intended
program. |
| * |
If file name extensions are set not
to display, open the Windows Explorer, select the [Tools] menu, followed
by [Folder Options] and the [View] tab, and remove the check mark
from the [Hide extensions for known file types] option. |
|
| |
| <Macintosh> |
| Most application programs are contained within a folder labeled with
its name or the software manufacturer's name inside the [Applications]
folder. Since file extension names are not appended by Macintosh systems,
you must find the executable file by searching for the file icon*. Click
or double-click the icon to confirm in advance that it starts the intended
program. |
| * |
Please note that folders may also be
represented by icons. |
|
| |
| Method 2 |
| |
| You can link a program by dragging and dropping an executable file or
its shortcut/alias from its folder on the desktop (or the [Start] menu
for Windows) into the [External Program] box. |
| |
 |
 |
• |
Some application programs linked to
the CanoScan Toolbox may not work. |
| • |
Some shortcuts or aliases of certain
application programs cannot be linked. Even if it could be linked,
it may not work in some cases. |
 |
|
| |
| To Delete a Link to a Program |
| |
| To delete a link to a program, click the [Delete] button. In the confirmation
dialog, click the [Yes] button ([OK] button for Macintosh). |
| |
 |
 |
• |
Link only those application programs
to the [Photo-1] or [Photo-2] button ([Photo] window) that support
images from the Toolbox. |
 |
 |
• |
The following image types can be passed
from the Toolbox to application programs: color 24 bit, grayscale
8 bit, and black and white 1 bit. Image types with other bit counts
cannot be passed to application programs. |
 |
|
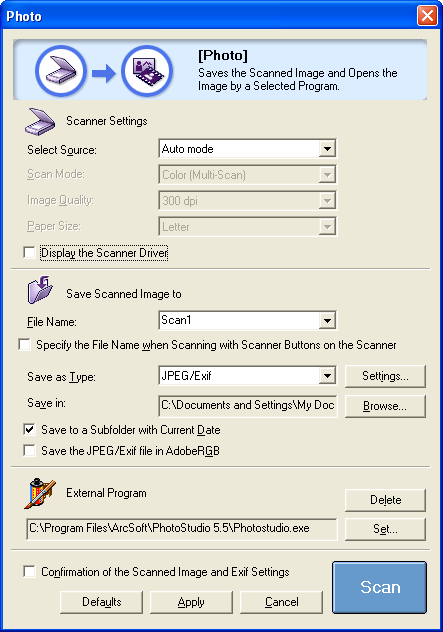
 [Photo-1]
or
  [Photo-2] button (if
an application program is linked) is clicked in the Toolbox main window.
This example shows the window opened with the [Photo-1] button.
 [Photo-1]
or
  [Photo-2] button (if
an application program is linked) is clicked in the Toolbox main window.
This example shows the window opened with the [Photo-1] button.


 at
the right end of [File Name] to select the name you entered previously.