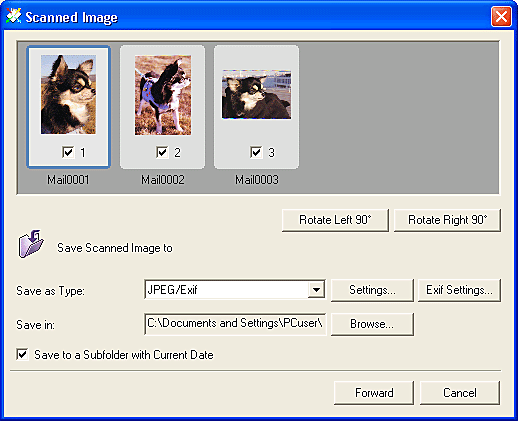
|
|||||||||||
After a scan, you can examine a thumbnail version of the image and specify the file format and destination. | |||||||||||
|
![]() |
|
|
Displays the thumbnail version of the scanned images. Images with a check mark are sent to the application program. Double-clicking an image displays it at a magnified size. | |
You can drag images to arrange their order in the display area. The image order here determines the page order in a multiple page PDF. |
|
|
Rotates the scanned image 90 degrees to the left or right for printing or as an e-mail attachment. Click the thumbnail of the image you want to rotate, and click the [Rotate Left 90°] or [Rotate Right 90°] button. |
|
|||||||||||||
Sets the format in which a file is saved. | |||||||||||||
|
|||||||||||||
|
|||||||||||||
|
[Settings] Button |
Displays the [File Settings] window, where you can set various settings
(i.e., compression type and PDF format) for the saved files. For details: [File Settings] Window |
[Exif Settings] Button |
Displays the [Exif Settings] window, where you can set Exif settings
for the saved files. For details: [Exif Settings] Window |
Save in |
Lists the location of the folder where the scanned images are saved. Click the [Browse] button to select a different save folder. |
Save to a Subfolder with Current Date | |||||||||
Sets whether or not a subfolder bearing the scanning date is created in the selected folder and the image files are saved to it. | |||||||||
|
[Forward (Save)] Button |
Sends (saves) the scanned image to the specified destination and ends the operation. |
[Cancel (Finish)] Button | |||||||||
Cancels the operation and returns to the previous window. Deletes all the images scanned in the operation. | |||||||||
|
Top |