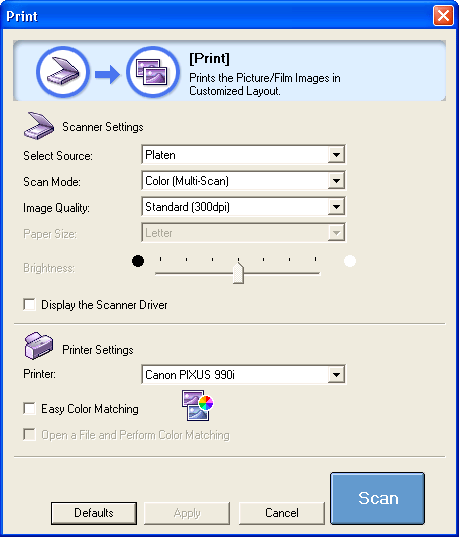
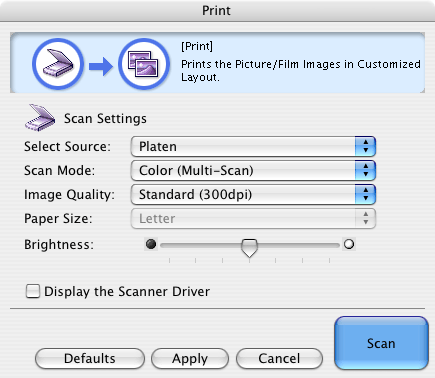
|
|||||||||||
| This function scans an item, displays the [Print Layout] window for changing paper size, print settings, size and position, and sends the image to the printer. | |||||||||||
|
|||||||||||
| The following window is displayed when the |
|||||||||||
|
|||||||||
|
|||||||||
| <Macintosh> | |||||||||
![]() |
|||||||||
|
||||||||||||||||||||
| Select the type of document to scan. | ||||||||||||||||||||
|
||||||||||||||||||||
|
||||||||||||||||||||
|
||||||||||||||||||
| Selects how the document is scanned depending on the document type. | ||||||||||||||||||
|
||||||||||||||||||
|
||||||||||||||||||
|
|||||||||
| This category selects the scanning resolution. The higher the resolution (the larger the value), the finer the resulting image. |
|||||||||
|
|||||||||
|
|||||||||
|
|||||||||
| This category sets the size of the item to be scanned. | |||||||||
|
|||||||||
| If the [Stitch-assist (11"x17")], [Stitch-assist (A3)] or [Stitch-assist
(Platen x2)] option is selected, the program scans the left half and then
the right half of the item, and merges both halves into one image. For details: Stitch-assist Procedures (Scanning a Document Larger than Document Glass) |
|||||||||
| If the [Custom] option is selected, the [Paper Size Settings] window opens. Select a [Unit] option, input [Width] and [Height] values, and click the [OK] button. | |||||||||
![]() |
|||||||||
|
|||||||||
|
|||||||||||||||||
| This category sets the brightness setting for the scan. Drag the slider left to darken the image or right to brighten it. |
|||||||||||||||||
|
|||||||||||||||||
|
|||||||||||||||||||
| If a check mark is placed in this category, the ScanGear window will
open when you click the [Scan] button at the window's lower right corner,
allowing you to adjust the scan settings in detail. The Scanner settings, including [Select Source], [Scan Mode], [Image Quality], [Paper Size] and [Brightness], in the [Print] window are disabled. Set them in the ScanGear window instead. |
|||||||||||||||||||
|
|||||||||||||||||||
|
|
| This category selects the printer to use when multiple printers are connected. |
|
|||||||||||||||||||||||||
| This sets whether or not color settings are coordinated between the scanner and a printer. | |||||||||||||||||||||||||
|
|||||||||||||||||||||||||
|
|||||||||||||||||
| This function is enabled when the [Easy Color Matching] option is checked. | |||||||||||||||||
| This function opens a JPEG image file saved with Adobe RGB color profile, performs [Easy Color Matching], and sends the image to the [Print Layout] window. | |||||||||||||||||
| When this option is checked, the [Scan] button becomes the [Open] button. Click the [Open] button to specify the JPEG image file saved with Adobe RGB color profile. |
|||||||||||||||||
|
|||||||||||||||||
| [Defaults] Button |
| This button restores each setting in the window to its default setting. |
| [Apply] Button | |||||||||
| This button makes the selected settings take effect and display the next
time the window is used. Pressing the [Cancel] button instead of [Apply] will reset the changes to the previous state. |
|||||||||
|
|||||||||
| [Cancel] Button |
| This button cancels any settings that you have changed, closes the window that is currently open and displays the Toolbox main window. |
| [Scan] Button | |||||||||
| This button scans the item and displays the [Print Layout] window. For details: [Print Layout] Window |
|||||||||
| If the [Display the Scanner Driver] option is checked, it opens the ScanGear window, and after the [Scan] button is pressed, the [Print Layout] window will display. | |||||||||
|
|||||||||
| Top |