[Copy] Button
 
This function scans an item and prints out the image with the printer.
 
This procedure requires the use of a printer. For instructions on setting up your printer, see the operation manual that came with the printer.
The sizes and types of paper available vary according to the printer used.
This button works if both the scanner and the printer are connected to the same computer. It may not work correctly with a network printer.
 
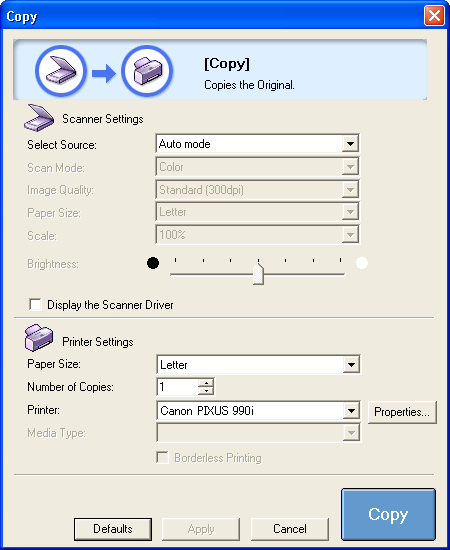
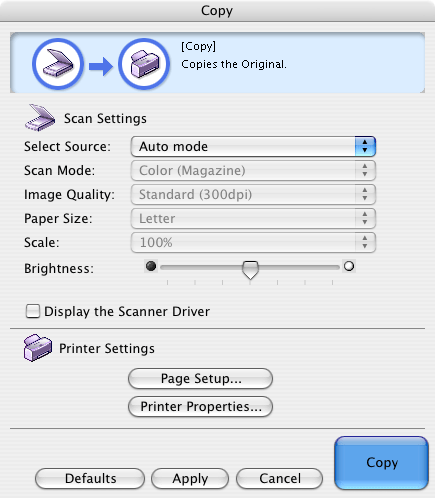
The following window is displayed when the [Copy] button is clicked in the Toolbox main window.

<Windows>
 
 
In Windows, a portion of the window's contents may be different when used with some printer models.
 
<Macintosh>
 

Select Source
 
Select the type of document to scan.
 
Platen Scans paper documents and photographs.
Film Scans 35 mm film.
Auto mode Automatically judges whether it is a platen item or film and scans accordingly.
 
When [Auto mode] is selected, the settings for [Scan Mode], [Image Quality], [Paper Size], [Scale], and [Brightness] cannot be selected. The following settings are used to scan.
Scan Mode Image Quality Paper Size
Platen Color Standard (300dpi) A4 (Letter)
Film Scan all frames Standard (300dpi) 35mm Film

Scan Mode
 
Selects how the document is scanned depending on the document type.
 
Black and White Scans an item as a black and white image. The contrast of the image is expressed as a black or white.
Grayscale Scans monochrome photographs when grayscale images are needed. The [Descreen] function is set to [OFF].
Grayscale (Magazines / Catalogs) Scans monochrome documents. The [Descreen] function is set to [ON].
Color Scans color photographs and documents with the [Descreen] function set to [OFF].
Color (Magazine) Scans color documents with the [Descreen] function set to [ON].
Color (Multi-Scan) Scans color photographs and documents. If more than one item is placed on the document glass of the scanner, each one is automatically cut out, straightened, and placed in an individual file.
Color (Auto crop) Scans color documents. Automatically detects item positions and scans the smallest possible area into which all items will fit.
Scan all frames (film only) Scan all the detected frames.
Display thumbnails (film only) Display the thumbnails of the detected frames, and then scan the selected frames.
 
Moiré patterns may appear in images scanned from printed materials. The [Descreen] function limits this to the greatest possible extent. However, scanning takes longer if [Descreen] is set to [ON].
Multiple items will be printed when multiple items are scanned with [Color (Multi-Scan)].
For instructions on how to place documents on the scanner: Multi Scan Functions

Image Quality
 
This category selects the scanning resolution.
The higher the resolution (the larger the value), the finer the resulting image.
 
High Speed (150dpi) Scans at 150 dpi. For film, select this option to print the scanned image at the photo size (4" x 6").
Standard (300dpi) Scans at 300 dpi. For film, select this option to print a high-quality print at the photo size (4" x 6").
High Quality (600dpi) Scans at 600 dpi. For film, select this option to print up to A4 (Letter) size, or for printing on a high performance color printer.
 
If [Fit to paper] is selected in [Scale], the resolution will change automatically in response.
For information on resolutions: Resolution Settings

Paper Size
 
This category sets the size of the item to be scanned.
 
Platen A4, A5 Portrait, A5 Landscape, Letter, Business Card, 4" x 6" Portrait, 4" x 6" Landscape, Stitch-assist (11"x17"), Stitch-assist (A3), Stitch-assist (Platen x2), Custom
Film 35mm Film
 
If the [Stitch-assist (11"x17")], [Stitch-assist (A3)] or [Stitch-assist (Platen x2)] option is selected, the program scans the left half and then the right half of the item, and merges both halves into one image.
For details: Stitch-assist Procedures (Scanning a Document Larger than Document Glass)
 
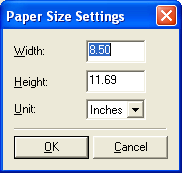
If the [Custom] option is selected, the [Paper Size Settings] window opens. Select a [Unit] option, input [Width] and [Height] values, and click the [OK] button.
 
 
The [Paper Size] cannot be selected when the [Scan Mode] is set to [Color (Multi-Scan)] or [Color (Auto crop)].

Scale
 
This category selects whether the image is scanned and resized to fit the printing stock or scanned at the original size.
 
Platen 25% (MIN), 47% (A4: 4"x6"), 70% (A4: A5), 100%, 141% (A5: A4), 200% (4"x6": A4), 400% (MAX), Fit to paper, Custom
Film Photo size, Fit to paper
 
[Fit to paper] automatically adjusts the dimensions of the scanned image so that the entire image fits on the printing stock. However, since the image's aspect ratio (width to height) is not changed, white spaces may appear at the top and bottom or sides.
If the [Custom] option is selected, the [Scale Setting] window will display. Input a value and click the [OK] button. Values can be input in the range of 25% to 400%.
 
Scanned images are printed inside the printable area of your printer. The printable area varies between printers. Please see your printer manual to determine your printer's printable area.

Brightness
 
This category sets the brightness setting for the scan.
Drag the slider left to darken the image or right to brighten it.
 
The [Brightness] cannot be adjusted if the [Scan Mode] is set to [Color (Multi-Scan)] or [Color (Auto crop)].
The Brightness cannot be set when [Film] or [Auto mode] is chosen in the [Select Source] category.
In the [Black and White] scan mode, you can use this category to set the threshold value between black and white.

Display the Scanner Driver
 
This category sets whether or not the scan settings are set with the ScanGear scanner driver.
 
If a check mark is placed in this category, the ScanGear window will open when you click the [Copy] button at the window's lower right corner, allowing you to adjust the scan settings in detail.
The Scanner settings in the [Copy] window, including [Select Source], [Scan Mode], [Image Quality], [Paper Size], [Scale], and [Brightness], are disabled. Set them in the ScanGear window instead.
 
If you have selected Color/A4 and more than 1200 dpi in the ScanGear window, a warning message will display and you will not be able to proceed with the scan.
If [Multi-Scan] is selected in the ScanGear window, the number of image files sent to the [Print Layout] window corresponds to the number of items on the document glass of the scanner.
For ScanGear settings: Simple Mode Functions, Advanced Mode Functions, or Multi Scan Functions

Printer Settings <Windows>
 
Paper Size
 
This category sets the size of the printer Paper Size (printing stock).
 
The selection of printer paper size (printing stock) options will vary according to the selected printer.
 
Number of Copies
 
This category sets the number of copies to print.
Click the (up/down) buttons on the right or input a number (up to 99) in the box.
 
Printer
 
This category selects the printer to use when multiple printers are connected.
To set detailed printer settings, click the [Properties] button.
 
Media Type
 
This category selects the type of media used for printing.
 
The available media may differ according to the printer used.
 
Borderless Printing
 
If a check mark is placed in this category, the image is printed without a border over the entire page.
 
This category is only available when the selected printer is a Borderless Printing compatible Canon Bubble Jet model.
Since the [Borderless Printing] function expands the image data beyond the margins of the page, the portion that falls outside the page margins will not be printed.

Printer Settings <Macintosh>
 
[Page Setup] Button
 
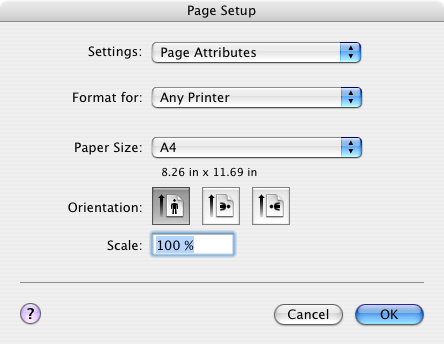
This button allows you to set the printing stock settings.
Set the paper size and orientation, et cetera, and click the [OK] button.
 
Click this button and select a printer in the [Format for] pull-down menu in the [Page Setup] dialog.

 
[Printer Properties] Button
 
This button allows you to set the settings for the printer, such as the number of printouts or print quality.

[Defaults] Button
 
This button restores each setting in the window to its default setting.

[Apply] Button
 
This button makes the selected settings take effect and display the next time the window is used.
Pressing the [Cancel] button instead of [Apply] will reset the changes to the previous state.
 
The next time you press a scanner button to start a function, it will use the settings saved with the [Apply] button.
For instructions on scanning with the scanner buttons: Scanning with Scanner Buttons

[Cancel] Button
 
This button cancels any settings that you have changed, closes the window that is currently open and displays the Toolbox main window.

[Copy] Button
 
This button scans the item using the selected settings and sends the data to the printer. If the [Display the Scanner Driver] option is checked, it opens the ScanGear window instead.
 
Multiple prints are printed if multiple items are scanned with the [Scan Mode] set to [Color (Multi-Scan)].

Top