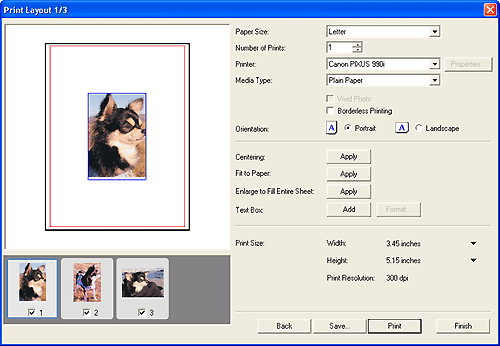
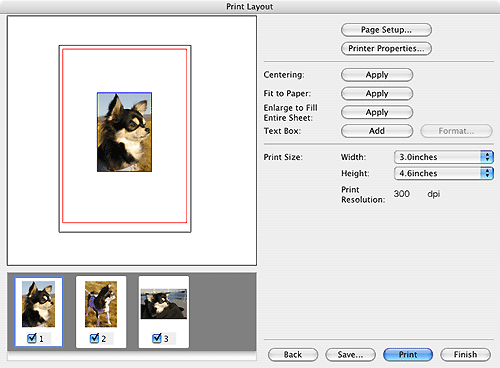
[Print Layout] Window
 
This window allows you to adjust print layout settings.
If you click the [Scan] button on the [Print] window, the [Print Layout] window is displayed after scanning is completed.
 
If you place a check mark beside [Open a File and Perform Color Matching] on the [Print] window, the [Print Layout] window is displayed when you select a file and click the [Open] button.
 
Paper sizes and printer functions available vary by the model of your printer.
Some functions may not be available for your printer.

<Windows>
 
 
<Macintosh>
 

Display Area
 
This area displays the image that will be sent to the printer.
 
The thick outer frame indicates the dimensions of the paper, the inner red frame the printable area, and the blue frame the dimensions of the image.
In the display area, you can change the position and size of the image as it will be printed.
 
Resizing
You can resize the image by dragging the blue frame of the image with the mouse cursor, which will change to the , , or cursor. You can resize it with a fixed aspect ratio (ratio of width to height). Double-clicking an image resets it to the original size and positions it in the center of the page.
 
Repositioning
To move the image, place the mouse cursor over it, wait until the cursor transforms into the shape, and drag the image to the desired position.

Thumbnail Display Area
 
This area displays the thumbnails of all the scanned images. Click on a thumbnail to display the image in the display area.

Printer Settings <Windows>

Paper Size
 
Sets the size of the paper for printing.
 
The paper sizes available will vary according to the printer selected.

Number of Prints
 
Sets the number of printouts.
 
Click (up/down buttons) on the right or enter a number (up to 99) in the box.

Printer
 
Selects the printer to use when multiple printers are connected.
 
To set detailed printer settings, click the [Properties] button.
 
This option cannot be selected if a check mark is present in the [Easy Color Matching] in the [Print] window.

Media Type
 
Selects the type of media used for printing. Make sure to select the one that matches the type of media loaded in your printer.
 
This option may not be displayed depending on the printer selected.
The available media types may vary according to the printer selected.
The expected color results cannot be obtained in some cases.

Vivid Photo
 
A check mark in this option prints the image in bright color tones.
It is particularly effective for portraits set against a backdrop of vegetation, sky or ocean.
 
This option is only available for Vivid Photo compatible Canon Bubble Jet printers.
This option cannot be selected if a check mark is present in the [Easy Color Matching] in the [Print] window.

Borderless Printing
 
If a check mark is placed in this option, the image is printed without a border over the entire page.
 
This option is only available when the selected printer is a Borderless Printing compatible Canon Bubble Jet model.
Since this function expands the image data beyond the margins of the page, the portion that falls outside the page margins will not be printed.

Orientation
 
Selects the printing orientation from [Portrait] or [Landscape].

Printer Settings <Macintosh>

[Page Setup] Button
 
This button allows you to set the printing stock settings.
 
Set the paper size and orientation, et cetera, and click the [OK] button.
 
Click this button and select a printer in the [Format for] pull-down menu.

[Printer Properties] Button
 
This button allows you to set printer settings, such as the number of printouts and print quality.

Centering
 
Clicking the [Apply] button centers the image in the page.

Fit to Paper
 
Clicking the [Apply] button resizes the scanned image automatically to fit the printing stock. Please note, however, that the aspect ratio (ratio of width to height) of the image is retained, so that white spaces at the top, bottom or sides may result from a mismatch between the item's shape and the printing stock.
 
The scanned image prints within your printer's printable area on the page. This area varies between printer models. See your printer manual for more information on its printable area.
Please note that printing with the Borderless Printing function expands the image data beyond the margins of the page. Therefore, the data that falls outside the page margins will not be printed.
You can check the size of the image in the display area.

Enlarge to Fill Entire Sheet
 
Clicking the [Apply] button expands the scanned image automatically to fit the printing stock. Please note, however, that the image's aspect ratio (ratio of width to height) is retained, so that the top, bottom or side portions of the image may extend beyond the page margins if there is a mismatch between the shapes of the item and the printing stock.
 
The scanned image prints within your printer's printable area on the page. This area varies between printer models. See your printer manual for more information on its printable area.
Please note that printing with the Borderless Printing function expands the image data beyond the margins of the page. Therefore, the data that falls outside the page margins will not be printed.
You can check the size of the image in the display area.

Text Box
 
Allows you to input text that will be output to the printer.
You can enter image titles, dates and comments.
 
[Add] Button
Click this button to display a text box for inputting text.
 
Edit Double-click the center of the box. The cursor will change to a text cursor, allowing you to edit or delete the text.
Delete Click its border to select it and press the [Delete] key. You can also select the box, right-click the mouse and select [Delete] in the pop-up menu (Windows only).
Move Move the mouse cursor over the box's border until the cursor changes to the cursor and then drag the box into position.
Resize Click the border to select the box and drag one of its corners or the red squares on the sides.
 
Up to 10 text boxes can be added to an image.
 
[Format] Button
Click this button to display a window for formatting text in a text box.
 
Select [Font], [Font style], [Size], [Effects], [Color] and [Script] (for Macintosh, [Font], [Size], [Color] and [Style]), then click [OK].
 
This button is only enabled when a text box has been selected.

Print Size
 
Displays the scanned image's output size and output resolution.
 
Click the arrow to the right of [Width] or [Height] to select the unit from [inches], [centimeters] or [pixels].
 
The [width] and [height] cannot be displayed in different units.
The [width] and [height] values will change in step with the image in the display area when it is resized. The output resolution will also change accordingly.

[Back] Button
 
Cancels the operation and returns to the [Print] window.
Clicking this button displays a confirmation dialog.
 
Clicking the [OK] button closes the [Print Layout] window and returns to the [Print] window.
 
Windows: You can also return to the [Print] window by clicking the close box at the upper right of the dialog.

[Save] Button
 
This button saves the image in the [Display Area].
Set the location and file format for saving the scanned images in the window that is displayed.
For details: Confirmation of the Scanned Image and Exif Settings
 
When the [Easy Color Matching] option is enabled, the newly created file will have "_ (underscore)" appended before the original file name, as it is saved using Adobe RGB.

[Print] Button
 
This button initiates printing according to the selected settings.

[Finish] Button
 
This button closes the [Print Layout] window.

Top