Preferences Window
 
The preferences window allow you to specify detailed settings for ScanGear functions. Click [Preferences] in the Advanced Mode and select [Preview], [Scan], [Color Settings], or [Scanner] sheet to change the settings as required.

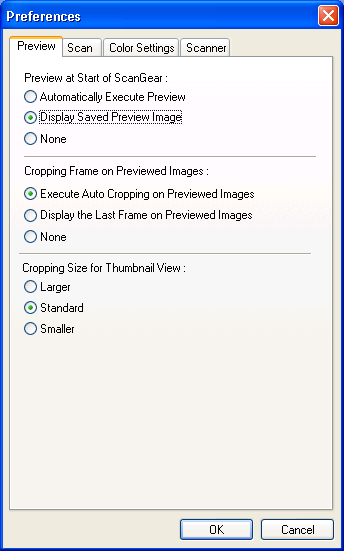
[Preview] Sheet
 

Preview at Start of ScanGear
 
This category sets whether or not a preview scan is performed when ScanGear is started. It is set to [Display Saved Preview Image] by default.
 
Automatically Execute Preview Automatically performs a preview scan when ScanGear is started.
Display Saved Preview Image Displays the last preview image saved. Color adjustment, toolbar, and Advanced Mode settings are also retained.
None Does not display the preview image when ScanGear is started.

Cropping Frame on Previewed Images (platen only)
 
This category sets whether or not the image is cropped when an image is previewed. It is set to [Execute Auto Cropping on Previewed Images] by default.
 
Execute Auto Cropping on Previewed Images Automatically crops the image to the size of the document when an image is previewed.
Display the Last Frame on Previewed Images Crops the image using the last cropping frame when an image is previewed.
None Does not display the previous cropping frame when an image is previewed.
 
The [Auto Crop] function crops an image of multiple items on the document glass of the scanner as if they were a single item. In contrast, the [Multi-Crop] function detects each individual item and crops them accordingly.

Cropping Size for Thumbnail View
 
This category sets the display size of thumbnails when film is scanned. It is set to [Standard] by default.
 
Larger Scans approximately 105% of the width and length of the standard film.
Standard The standard setting.
Smaller Scans approximately 95% of the width and length of the standard film.
 
Changing options in this category resets all the settings in the preview image.

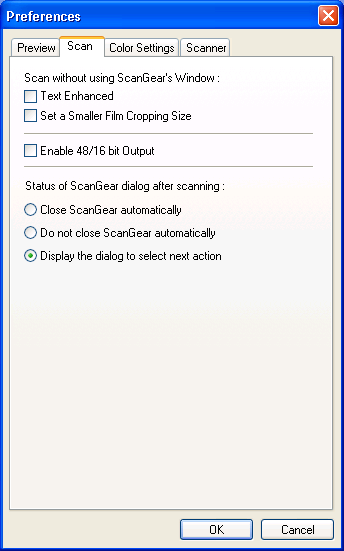
[Scan] Sheet
 

Scan without using ScanGear's Window
 
Some application programs, such as OCR software, do not display ScanGear's main window while scanning (UI off mode). These application programs set the scanning settings, preventing you from changing the color mode settings with the usual procedures. If you wish to scan with one of the color modes below, use this function to override the application program's settings. This setting is disabled by default.
 
Text Enhanced (Windows only) Sets [Color Mode] to [Text Enhanced].
Set a Smaller Film Cropping Size Scans 95% (of the width and length) of each standard film frame.
 
This setting is disabled when the UI mode (main window displays) is active.

Enable 48/16 bit Output
 
If enabled, the [Color(48bit)] and [Grayscale(16bit)] options are added to the [Color Mode] setting. This setting is disabled by default.
 
The [Grayscale(16bit)] setting can only be set when film is selected in [Select Source].
If you remove the check mark from the [Enable 48/16 bit Output] category in the [Preferences] window after you select [Color(48bit)] or [Grayscale(16bit)] in the Advanced Mode, the [Color(48bit)] setting will switch to the regular [Color] setting and the [Grayscale(16bit)] setting to the regular [Grayscale] setting.
Some application programs may not support images or end the program when scanned with the [Color(48bit)] or [Grayscale(16bit)] settings.

Status of ScanGear dialog after scanning
 
Sets whether to close ScanGear after a scan.
 
Close ScanGear automatically Closes ScanGear after scanning is complete. The scanned image is displayed in the application program.
Do not close ScanGear automatically Does not close ScanGear after scanning is complete. You can scan additional documents.
Display the dialog to select next action Prompts you after each scan to select whether to close ScanGear.
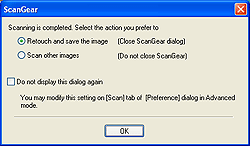


Check [Do not display this dialog again] if you do not want to see this window.
 
This setting will be shown in the [Scan] sheet. Also, the setting in the [Scan] sheet will be reflected in this selection window.
 
Setting in Selection Screen Setting in [Scan] sheet
Retouch and save the image
(Close ScanGear dialog)
Close ScanGear automatically
Scan other images
(Do not close ScanGear)
Do not close ScanGear automatically
 
If you check [Do not display this dialog again], the current setting will be effective for the next scanning.

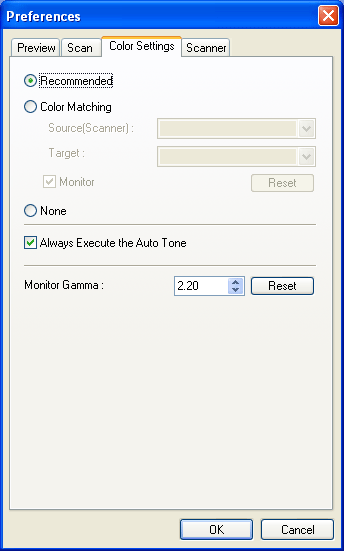
[Color Settings] Sheet
 

Recommended/Color Matching/None
 
Select a color correction method from [Recommended] (default), [Color Matching], and [None].
 
Recommended Reproduces document colors on computer monitors. It is recommended for most purposes.
Color Matching This option makes colors consistent among the scanned item, the monitor and a color printer. [Auto Tone] or Color Correction Buttons cannot be used. Only available when [Color Mode] is set to [Color].
- Source(Scanner): Selects the scanner profile.
- Target: Selects color space, monitor profile, and printer profile.
- Monitor: Displays a monitor-optimized preview image. Enabled by default.
- [Reset] Button: Resets the color matching settings (color profiles).
None No color correction is performed by ScanGear with this option. [Auto Tone] in Image Settings cannot be used.
 
[Color Matching] will operate correctly when the settings are properly set in ScanGear, monitor settings, the application program (such as Adobe Photoshop), and the printer driver. For details on these settings, see the documentation for each product.

Always Execute the Auto Tone
 
A check mark in this option causes Auto Tone adjustment to be activated for each scan. This setting is enabled by default.
 
This option cannot be used if [None] is selected.

Monitor Gamma
 
By setting the gamma value of a monitor (display), you adjust the input data to the brightness characteristics of the monitor. Adjust this setting when the coloration of an original item is not accurately reflected in the monitor. Click [Reset] to reset the gamma value to the default (Windows: 2.20, Macintosh: 1.80).

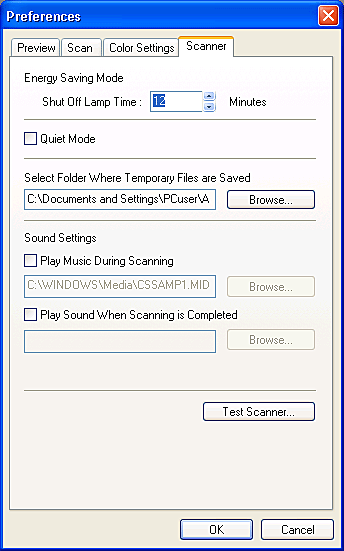
[Scanner] Sheet
 

Energy Saving Mode
 
The scanner lamp lights under normal circumstances when the scanner is powered. You can set it to reduce energy consumption by having the lamp shut off if a scan is not initiated for a predetermined length of time.
Specify the period of time that elapses before the lamp shuts off by clicking the up/down arrow buttons to the right of the box or input a number directly to set the value. It can be set in 4-minute intervals in the range from 4 minutes to 56 minutes.
 
When ScanGear is installed, the Shut Off Lamp Time is set to 12 minutes by default.

Quiet Mode
 
If a check mark is placed in this category (function is turned on), the scanning unit will slow down and lessen the noise during previews and scans. This setting is disabled by default.
 
Scanning will take longer than normal with this setting.

Select Folder Where Temporary Files are Saved
 
This section selects the folder to which image files are temporarily saved. Click [Browse] and select the folder where the scanned images are saved.
 
Temporary folder locations vary by the applications (i.e., CanoScan Toolbox) that use them.

Sound Settings
 
A sound file can be played during a scan or serve as an alert at the end of a scan.
 
Check either [Play Music During Scanning] or [Play Sound When Scanning is Completed]. Click the [Browse] button and select a sound file. This setting is disabled by default.
 
In Macintosh, the [Play Music During Scanning] option is not available.

[Test Scanner] Button
 

This button allows you to test the scanner for proper operation.
Click [Test Scanner] to display the [Scanner Diagnostics] window. Then click [Start] to initiate the diagnostic test.


Top