| Output Size |
| |
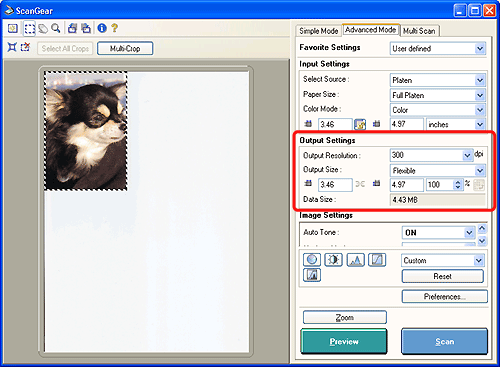
| You can select [Flexible] to specify the width and height of an image,
or fixed sizes for printing or for on-screen display. You can also use
[Add/Delete] to register custom output sizes. |
| |
| Flexible |
| |
| Displays the size (width and height) of the cropping frame for the preview
image in the display boxes. You can input values directly into the display
boxes to make fine adjustments to the output size and the zoom ratio. |
| |
| When [Flexible] is selected, the default setting in [Output Resolution]
will vary as follows with the [Select Source] option you select. |
| |
| Option Selected
in [Select Source] |
Default Output
Resolution |
| Platen |
300 dpi |
| Film |
1200 dpi |
|
| |
| Other than Flexible |
| |
| You can select the size for printing or the size for on-screen display.
You can set an output resolution separately for each size category. The
same output resolution is used within each category. |
| |
| Other than Flexible |
Default Output Size |
Default Output Resolution |
| Print (Paper Size) |
Business Card, 4" x 6" Landscape,
4" x 6" Portrait, A5, B5, A4, Letter, Legal, B4, A3
For Macintosh, you can also select: L Landscape, L Portrait, LL Landscape, LL Portrait, and Hagaki.
You cannot select width, height, or percentage. The percentage will
be adjusted automatically according to the size of cropping frame. |
300 dpi |
Image display
(Image Display Sizes) |
128 x 128 pixels, 640 x 480 pixels,
800 x 600 pixels, 1024 x 768 pixels, 1280 x 1024 pixels, 1600 x 1200
pixels, 2048 x 1536 pixels, 2272 x 1704 pixels, 2592 x 1944 pixels
You cannot select width, height, or percentage. The preview image
will be cropped automatically according to the selected size. This
cropping frame can be enlarged or reduced without changing the aspect
ratio (width-to-height ratio). |
150 dpi |
|
| |
| Add/Delete the Output Size |
| |
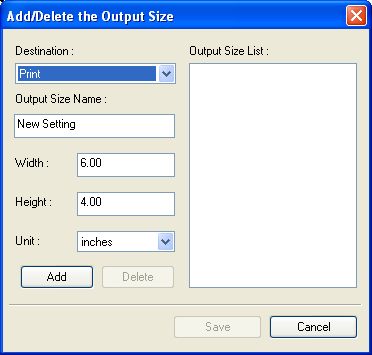
| The [Add/Delete the Output Size] window will appear when the [Add/Delete]
option is selected. You can set your own output sizes and save or delete
them. |
| |
 |
| |
| In this dialog, you can set output sizes and save them. Once saved, the
output sizes saved will display in [Output Size] in [Advanced Mode], and
be available for selection thereafter. |
| |
| When you want to add an output size, select the [Destination] option
([Print] or [Image display]), specify [Output Size Name], [Width], [Height],
and click [Add]. The custom setting will appear in [Output Size List].
Click [Save] to save all output sizes added. Click [Cancel] to cancel the
setting. |
| |
| When you want to delete an output size, select the size to be deleted
from [Output Size List], and then click [Delete]. Once deleted, the output
size will disappear from the list. Click [Save] to save the setting. Click
[Cancel] to cancel the setting. Output sizes initially provided cannot
be deleted. |
| |
 |
 |
• |
Depending on the subcategory selected, up to a maximum
of 10 custom output sizes may be added with the [Add/Delete] option
in [Output Size]. |
| • |
The [Unit] will be [centimeters] or [inches] if
[Destination] is set to [Print]. The [Unit] will be [pixels] if [Destination]
is set to [Image Display]. |
 |
|


