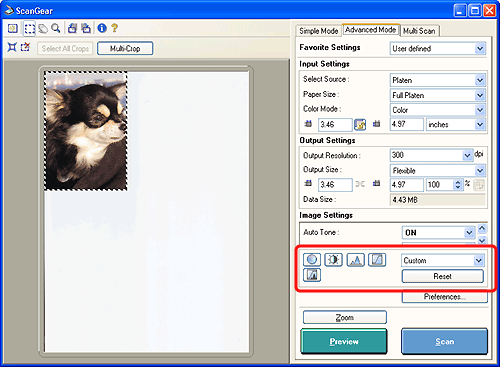
Color Correction Buttons
 

[Color] or [Color(48bit)] Selected in [Color Mode]
 

[Grayscale] or [Grayscale(16bit)] Selected in [Color Mode]
 

[Black and White] Selected in [Color Mode]
 
 
No button is displayed when [Color Mode] is set to [Text Enhanced] (Windows only).
The color correction buttons will not be displayed when [Color Matching] is selected in [Color Settings] sheet in [Preferences] window.

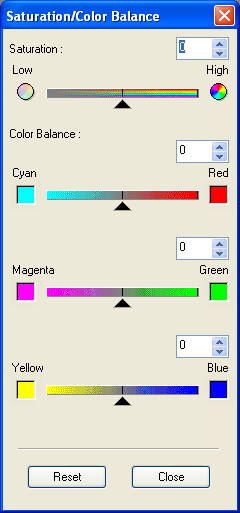
Saturation/Color Balance
 
This button adjusts the saturation and the color balance of an image. Adjust these settings if the original item to be scanned is faded or too saturated.
 
 
* The farther the slider is dragged to the right, the higher the saturation; the farther to the left, the lower the saturation. You can also enter a value (-127 to 127) directly.
* Move the slider for each color channel to adjust the color balance. For example, move the [Cyan] - [Red] slider to the left to apply more cyan (and less red).
   
This button is not available when [Color Mode] is set to [Black and White], [Grayscale], [Grayscale(16bit)], or [Text Enhanced] (Windows only).

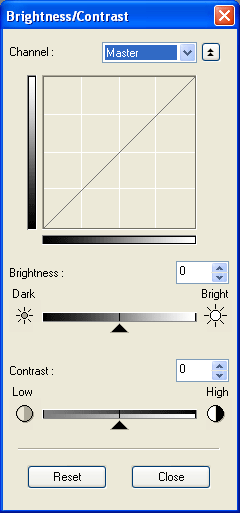
Brightness/Contrast
 
This button adjusts the brightness and the contrast (degree of difference between dark and light) of an image. Adjust these settings if the original item to be scanned is too bright, dark or flat (low contrast).


* Click to display the detailed information. Click to switch back the display.
* On a color image, select [Red], [Green], or [Blue] in [Channel] to adjust individual color channels, or [Master] to adjust all three channels as a whole.
* The farther the slider is dragged to the right, the brighter the image; the farther to the left, the darker the image. You can also enter a value (-127 to 127) to specify the brightness.
* The farther the slider is dragged to the right, the higher the contrast; the farther to the left, the lower the contrast. You can also enter a value (-127 to 127) to specify the contrast.

This button is not available when the Color Mode is set to [Black and White].

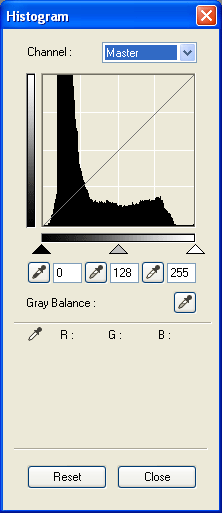
Histogram
 
The histogram expresses the distribution of brightness data (how many dots share each brightness value) in an image. Use it to set the maximum brightness level (highlights) in an image, or the minimum level (shadows), to cut off the data beyond these levels and smooth out the distribution of brightness data between the highlights and shadows.
 
This button is not available when [Color Mode] is set to [Black and White].


* On a color histogram, select [Red], [Green], or [Blue] in [Channel] to adjust individual color channels, or [Master] to adjust all three channels as a whole.

* Drag the sliders below the histogram to adjust settings.
- All of the data to the left of (Black-Point Slider) is set to a "0" brightness level (shadow).

- Move (Mid-Point Slider) horizontally to set the mid-point between the lightest and darkest colors on the preview image.

- All of the data to the right of (White-Point Slider) is set to a "255" brightness level (highlight).

* Click an eyedropper under the histogram to change the settings:
- Click (Black-Point Eyedropper) and position the mouse cursor over the section of the preview image which you want to be the darkest. You can also enter a value (0 to 245) directly.

- Click (Mid-Point Eyedropper) and position the mouse cursor over the section of the preview image which you want to be the mid-point between the lightest and darkest colors. You can also enter a value (5 to 250) directly.

- Click (White-Point Eyedropper) and position the mouse cursor over the section of the preview image which you want to be the lightest. You can also enter a value (10 to 255) directly.

- Click [Gray Balance] and position the mouse cursor over the preview image where you want to adjust the gray balance. Click on that pixel to use its RGB values (the grayscale value when [Color Mode] is set to [Grayscale]) to set the gray balance. The gray balance adjustment uses the point on which you click as the achromatic color reference and adjusts the rest of the image accordingly. This function is particularly effective on images with snow appearing to have a blue tint.

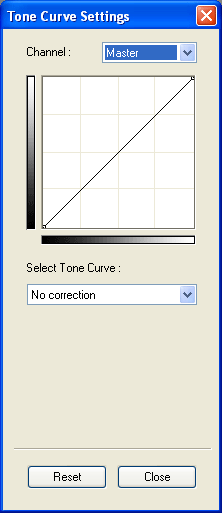
Tone Curve
 
The tone curve expresses the relationship between the brightness values of the scanner input and display output. You can adjust the brightness of particular sections of an image by changing the shape of the tone curve.
 

Select Tone Curve
 
* Select a tone curve from [Select Tone Curve].
 
- No correction
- Overexposure
- Underexposure
- High contrast
- Reverse the negative/positive image
- Edit custom curve
* When the [Edit custom curve] option is selected, the graph line becomes editable. You can also select the [Edit custom curve] option simply by clicking inside the graph. Click anywhere on the graph to insert a point through which the graph line will run in a smooth arc. The point is shown in black, and up to 15 points, including the end points, may be specified. You can move a point by dragging it with the mouse. The tone curve will change correspondingly. To delete a point, drag it outside the graph (in Windows, you can right-click to delete it).

Final Review
 
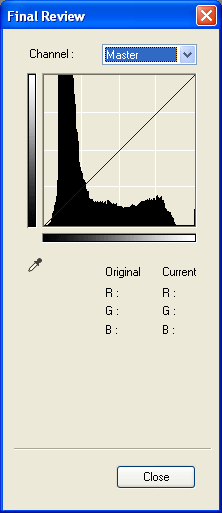
This button displays the histogram obtained from the final tone curve and subsequent image processing for final review for color correction. There are no settings that can be adjusted in the final review window.
 
 
* On a color histogram, select [Red], [Green], or [Blue] in [Channel] to check individual color channels, or [Master] to check all three channels as a whole.
* Placing the mouse cursor on the preview image displays pre- and post-adjustment RGB values (the K (Grayscale) channel only when [Color Mode] is set to [Grayscale] or [Grayscale(16bit)]) of the pixel beneath the cursor.
* The enlarged view of the section of the image is displayed in the [Final Review] screen where the mouse cursor is positioned.
   
You can have other settings windows open at the same time and adjust the settings for each tone curve while viewing the effect on the final review window.

Threshold
 
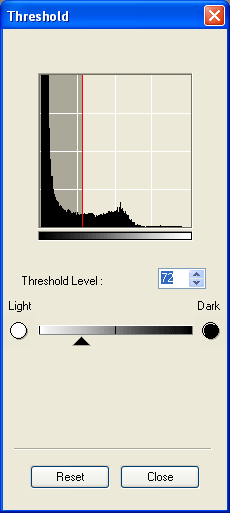
Although the brightness of individual dots in color and grayscale images is expressed as a value ranging from 0 to 255, with black and white images the interim brightness levels are set as either completely black (255) or completely white (0). The brightness level at which a dot is determined to be either black or white is known as the threshold level. Adjusting the threshold level is convenient for clearly distinguishing the text in a document or for lightening the background of a newspaper.
 
 
* Drag the slider to the right to increase the threshold level, which increases the dark area of the image. Drag the slider to the left to decrease the threshold level, which increases the light area of the image. You can also enter the threshold value directly from 0 to 255.

Channel (for all [Color Correction] Buttons other than [Saturation/Color Balance] and [Threshold])
 
Each dot in a scanned image is expressed in a mixture of red, green and blue color channels at different levels. Use the [Channel] pull-down menu to specify each color channel.
 
Master Sets/adjusts all three color channels, red, green, and blue in unison.
R(ed) Sets/adjusts only the red elements in the image.
G(reen) Sets/adjusts only the green elements in the image.
B(lue) Sets/adjusts only the blue elements in the image.
 
Only the [Grayscale] channel is available when the [Color Mode] category is set to [Grayscale].

[Reset] Button (for all [Color Correction] Buttons other than [Final Review])
 
This button cancels all the adjustments to the current settings window and resets them to the default values.

[Close] Button (for all [Color Correction] Buttons)
 
This button validates all the adjustments to the current settings window and closes the window.

Custom
 
You can name and register a set of settings created by the color correction buttons. You can also recall (from the pull-down menu) the tone curve/threshold settings and apply them to the previewed image.
 
Procedures for Registering Tone Curve/Threshold Settings
 
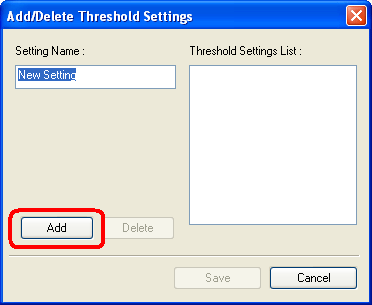
Select [Add/Delete] from the pull-down menu.
 
The [Add/Delete Tone Curve/Threshold Settings] window will open.
 
Specify a [Setting Name] and click the [Add] button. The specified name will now be registered in the [Tone Curve/Threshold Settings List] to the right. Click the [Save] button to save the setting.
 
 
You can register up to 10 settings for each category.
To delete a setting, select it in the [Tone Curve/Threshold Settings List] to the right and click the [Delete] button.

Procedure for Recalling Tone Curve/Threshold Settings
 
Select the registered setting from the pull-down menu.
 
Reset ([Advanced Mode] window)
 
This button cancels all the color correction adjustments and resets them to the default values.
 
Top